Introduction
Today, we are going to talk about the Zephyr Device Driver Model. I've been taking the nRF Connect SDK Fundamentals course, and these are my notes, which I hope will help someone. Here are the key points:
- In order to interact with a hardware peripheral or a system block, we need to use a device driver.
- Device driver (can simply refers to it as driver), is a software wich includes the ‘low-level’ details of the hardware (configuration, write, read operations, etc).
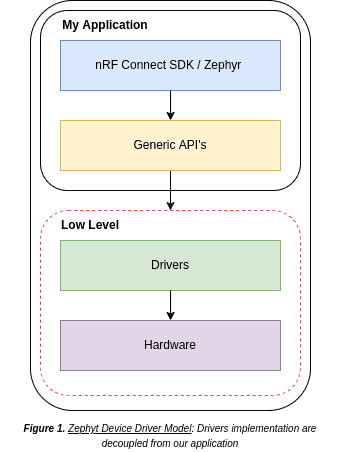
- In the nRF Connect SDK, we use generic API’s in our application to interact with the hardware. And the generic API’s, internally calls a specific driver related to that hardware (SPI, I2C, UART, etc).
- In the nRF Connect SDK, the drivers implementations are decoupled from the generic API’s. This decoupling means we can use the same code on different boards and just focus to configure or implement the driver(most drivers are implemented 😉 ).
- Important: Under the hood, the Zephyr device model is responsible for the association between generic APIs and device driver implementations.
Interacting with the Hardware using the Generic API
As we discussed before, our application will interacts with the hardware through the generic API. So, we need to obtain a reference for the hardware in question.
These are the steps to interact with the hardware.
- Get the node identifier from the devicetree by label through the
DT_NODELABEL() macro or by an alias through the macroDT_ALIAS(). - Identify which macro you should you use to get the device reference according to the peripheral in question. For example,
DEVICE_DT_GET()andGPIO_DT_SPEC_GET()macros. - Now, get the device reference (pointer) by passing the node identifier to the device reference macro you previously identified.
- Finally, before to using the device pointer, it should be checked using
device_is_ready()
GPIO Example
// step 1
#define LED0_NODE DT_ALIAS(led0)
// step 2 and 3
static const struct gpio_dt_spec led = GPIO_DT_SPEC_GET(LED0_NODE, gpios);
// step 4
if (!gpio_is_ready_dt(&led)) {
	return 0;
}
// write your own settings and logic stuff
int ret;
ret = gpio_pin_configure_dt(&led, GPIO_OUTPUT_ACTIVE);
if (ret < 0) {
	return 0;
}
ret = gpio_pin_toggle_dt(&led);
UART Example
// step 1
#define UART0_NODE DT_NODELABEL(uart0)
const struct device *dev;
// step 2 and 3
dev = DEVICE_DT_GET(UART0_NODE);
// step 4
if (!device_is_ready(dev)) {
    return;
}
Implementation Notes - Tips
Pointer to Device Implementation
-
To use a device driver generic API, you need a pointer of type
const struct devicethat points to the device's implementation. -
Each peripheral instance requires a separate pointer.
-
For example, for two UART peripherals (
uart0anduart1), you need two separate pointers:const struct device *uart0_dev = DEVICE_DT_GET(DT_NODELABEL(uart0)); const struct device *uart1_dev = DEVICE_DT_GET(DT_NODELABEL(uart1));
Peripheral-Specific APIs
- Most peripheral APIs in Zephyr have equivalents to
DEVICE_DT_GETanddevice_is_readythat are specific to the peripheral. - These APIs collect more information from the device tree structure and reduce the need for additional peripheral configurations in the application code.
- For example, for GPIO peripherals, use
GPIO_DT_SPEC_GET()andgpio_is_ready_dt().
General Tips
- Make sure your peripherals are correctly defined in the Device Tree.
- Check if a device is ready before using it to avoid errors.
- Use specific APIs for each peripheral to make setup easier and use Device Tree info.
Further Learning
For more details on this topic, refer to the nRF Connect SDK Fundamentals course, which provides comprehensive coverage of the device driver model and other essential concepts.
Upcoming Series
Stay tuned for more posts in this series, where we'll dive deeper into various aspects of nRF Connect SDK and Zephyr, providing practical insights and examples to help you master these powerful tools.
