Pre-requisites
Before we begin, ensure you have the following:
- Basic knowledge of C++ and Arduino programming
- An ESP32 development board
- A compatible TFT display (ILI9341 recommended)
- PlatformIO installed in your IDE (e.g., Visual Studio Code)
- Required libraries: LVGL and TFT_eSPI
Understanding LVGL Architecture
One of the standout features of LVGL is its ability to decouple the UI implementation from the underlying hardware. This means that you can write your user interface code without worrying about the specifics of the display or input devices. Let’s break down this architecture with the following diagram:
Where:
- User Interface: This layer represents the application code where you define UI elements like buttons, sliders, and labels.
- LVGL Library: The core library that handles drawing, themes, animations, and input management.
- Display Driver: This component interfaces between the LVGL library and the display hardware, converting LVGL commands into pixel data for the screen.
- Input Device Driver: Handles inputs from devices like touch screens, converting touch events into a format that the LVGL library can understand.
- Display Hardware: The actual screen that displays the graphics generated by the LVGL library.
- Input Hardware: Devices like touch panels that allow user interaction with the interface.
Display Buffer Structure
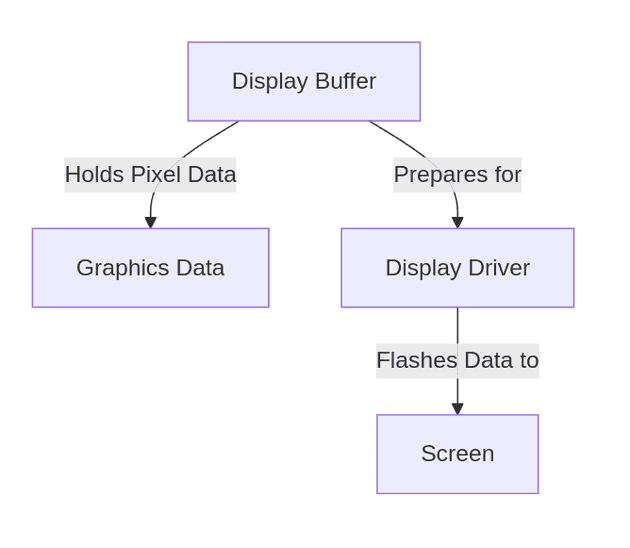
LVGL utilizes a display buffer to manage the rendering process effectively. The following diagram illustrates this concept:
Where:
- Display Buffer: A temporary storage area for pixel data. LVGL prepares graphics data in this buffer before sending it to the display.
- Graphics Data: This is the pixel information that will be rendered on the screen.
- Display Driver: This component retrieves the buffered data and pushes it to the display.
Input Device Management
Touch interactions are fundamental in embedded GUI applications. Here’s how LVGL manages input devices:
Where:
- Touch Input: This represents the user's interaction with the touch interface.
- Input Device Driver: Captures touch events and communicates the coordinates and state (pressed/released) to the LVGL library.
- LVGL Library: Processes this input data to update the UI accordingly.
Hardware Setup
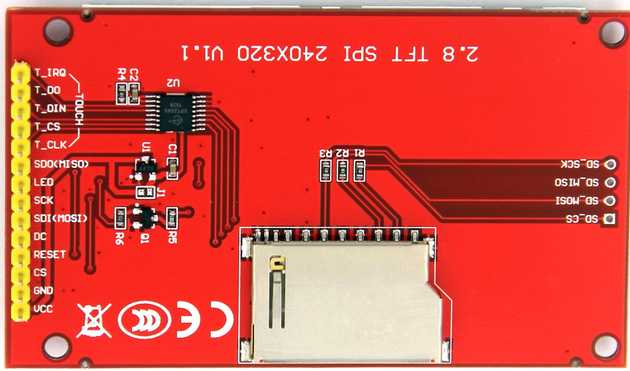
For this tutorial, we are using a 2.8" TFT display with an ILI driver, connected via SPI. In order to control this display, we are going to use the TFT_eSPI library.
Connect your ESP32 to the TFT display according to the following pin configuration:
- MISO: GPIO 19
- MOSI: GPIO 23
- SCK: GPIO 18
- CS: GPIO 15
- DC: GPIO 2
- RST: GPIO 4
- Touch CS: GPIO 21
Code Implementation
In this section, we'll guide you through setting up a simple GUI using LVGL on an Arduino with a TFT display. We’ll explain the code step by step, showing how to display a "Hello :D" label and enable touch interaction.
1. Including the needed libraries
We will start the code by including essential libraries that will manage the display (TFT_eSPI) and the LVGL GUI library.
#include <Arduino.h>
#include <lvgl.h>
#include <TFT_eSPI.h>
Key Components:
lvgl.h: This is the powerful LVGL graphics library, which will handle everything from buttons to animations.TFT_eSPI.h: A popular library that enables easy communication with the TFT LCD screen.
Display and Touch Objects:
We declare two LVGL objects, ui_Inicio for the main screen and ui_Label2 for a label that will display text.
lv_obj_t *ui_Inicio;
lv_obj_t *ui_Label2;
Next, we define the resolution of our display. For this example, the screen resolution is 240x320 pixels.
static const uint16_t screenWidth = 240;
static const uint16_t screenHeight = 320;
Display Buffer:
In the code, we set up a display buffer that will temporarily hold the pixel data to be sent to the display:
static lv_disp_draw_buf_t draw_buf;
static lv_color_t buf[screenWidth * screenHeight / 10];
Then, we initialize the TFT display object with the screen dimensions.
TFT_eSPI tft = TFT_eSPI(screenWidth, screenHeight);2. Display and Touchpad Functions
Display Flushing:
To actually display something on the screen, we need to implement a flush function. This function tells the LVGL how to send the buffer content to the TFT screen.
void my_disp_flush(lv_disp_drv_t *disp, const lv_area_t *area, lv_color_t *color_p) {
  uint32_t w = (area->x2 - area->x1 + 1);
  uint32_t h = (area->y2 - area->y1 + 1);

  tft.startWrite();
  tft.setAddrWindow(area->x1, area->y1, w, h);
  tft.pushColors((uint16_t *)&color_p->full, w * h, true);
  tft.endWrite();

  lv_disp_flush_ready(disp);  // Let LVGL know the flushing is done
}my_disp_flush(): This function pushes pixel data from the LVGL buffer to the screen using the TFT library’ssetAddrWindow()andpushColors()functions.lv_disp_flush_ready(): Notifies LVGL that the flushing process is complete.
Touchpad Reading:
To interact with the touchscreen, we read the touch coordinates from the TFT display.
void my_touchpad_read(lv_indev_drv_t *indev_driver, lv_indev_data_t *data) {
  uint16_t touchX = 0, touchY = 0;
  bool touched = tft.getTouch(&touchX, &touchY, 600);

  if (!touched) {
    data->state = LV_INDEV_STATE_REL;  // Not touched
  } else {
    data->state = LV_INDEV_STATE_PR;  // Pressed
    data->point.x = touchX;  // Update X position
    data->point.y = touchY;  // Update Y position
  }
}tft.getTouch(): Reads the touch position. If the screen is touched, it returns the X and Y coordinates; otherwise, it returns false.
3. The Setup Function
In setup(), we initialize everything: the TFT screen, touch calibration, and LVGL.
void setup() {
  Serial.begin(115200);

  lv_init();  // Initialize LVGL

  tft.begin();  // Start the TFT display
  tft.setRotation(0);  // Set screen orientation

  // Touch calibration data
  uint16_t calData[5] = {363, 3382, 297, 3319, 2};
  tft.setTouch(calData);  // Calibrate touch

  // Initialize LVGL's draw buffer
  lv_disp_draw_buf_init(&draw_buf, buf, NULL, screenWidth * screenHeight / 10);

  // Initialize the display driver
  static lv_disp_drv_t disp_drv;
  lv_disp_drv_init(&disp_drv);
  disp_drv.hor_res = screenWidth;
  disp_drv.ver_res = screenHeight;
  disp_drv.flush_cb = my_disp_flush;  // Attach our flush function
  disp_drv.draw_buf = &draw_buf;
  lv_disp_drv_register(&disp_drv);

  // Initialize the touchpad driver
  static lv_indev_drv_t indev_drv;
  lv_indev_drv_init(&indev_drv);
  indev_drv.type = LV_INDEV_TYPE_POINTER;
  indev_drv.read_cb = my_touchpad_read;  // Attach our touch function
  lv_indev_drv_register(&indev_drv);

  ui_init();  // Call the function that creates the UI
  Serial.println("Setup done");
}
Key Steps:
- LVGL Initialization:
lv_init()sets up the LVGL library. - Touch Calibration: The TFT display’s touch capabilities are calibrated with
setTouch(). - Buffer Setup: LVGL needs a buffer to store pixel data before sending it to the display.
- Display and Input Drivers: The display and touch drivers are initialized and attached to the LVGL library.
4. Creating the UI
The ui_init() function creates the user interface, including the label that displays "Hello :D".
Building a Touch-Enabled GUI with LVGL on Arduino
void ui_init() {
  lv_disp_t *dispp = lv_disp_get_default();
  lv_theme_t *theme = lv_theme_default_init(dispp, lv_palette_main(LV_PALETTE_BLUE), lv_palette_main(LV_PALETTE_RED), true, LV_FONT_DEFAULT);
  lv_disp_set_theme(dispp, theme);

  ui_Inicio = lv_obj_create(NULL);  // Create a screen object
  lv_obj_clear_flag(ui_Inicio, LV_OBJ_FLAG_SCROLLABLE);

  ui_Label2 = lv_label_create(ui_Inicio);  // Create a label
  lv_obj_set_align(ui_Label2, LV_ALIGN_CENTER);  // Align the label at the center
  lv_label_set_text(ui_Label2, "Hello :D");  // Set label text
  lv_obj_set_style_text_font(ui_Label2, &lv_font_montserrat_36, LV_PART_MAIN | LV_STATE_DEFAULT);

  lv_disp_load_scr(ui_Inicio);  // Load the screen into the display
}lv_obj_create(): Creates the main screen (ui_Inicio).lv_label_create(): Creates a label object (ui_Label2) and sets its text to "Hello :D".lv_obj_set_align(): Aligns the label at the center of the screen.
5. Running the Loop
The loop() function continuously runs the GUI handler to keep the display updated.
void loop() {
  lv_timer_handler();  // Process GUI tasks
  delay(5);  // Small delay to prevent hogging CPU resources
}
6. Testing
Connect your ESP32 device and hit the “Upload” button and yes, we have our hello world with LVGL.
Full Code
Here’s the complete code for the "Hello World" example:
// main.cpp
#include <Arduino.h>
#include <lvgl.h>
#include <TFT_eSPI.h>

lv_obj_t *ui_Inicio;
lv_obj_t *ui_Label2;

void ui_init(void);

/* Change to your screen resolution */
static const uint16_t screenWidth = 240;
static const uint16_t screenHeight = 320;

static lv_disp_draw_buf_t draw_buf;
static lv_color_t buf[screenWidth * screenHeight / 10];

TFT_eSPI tft = TFT_eSPI(screenWidth, screenHeight); /* TFT instance */

#if LV_USE_LOG != 0
/* Serial debugging */
void my_print(const char *buf) {
  Serial.printf(buf);
  Serial.flush();
}
#endif

/* Display flushing */
void my_disp_flush(lv_disp_drv_t *disp, const lv_area_t *area, lv_color_t *color_p) {
  uint32_t w = (area->x2 - area->x1 + 1);
  uint32_t h = (area->y2 - area->y1 + 1);

  tft.startWrite();
  tft.setAddrWindow(area->x1, area->y1, w, h);
  tft.pushColors((uint16_t *)&color_p->full, w * h, true);
  tft.endWrite();

  lv_disp_flush_ready(disp);
}

/* Read the touchpad */
void my_touchpad_read(lv_indev_drv_t *indev_driver, lv_indev_data_t *data) {
  uint16_t touchX = 0, touchY = 0;

  bool touched = tft.getTouch(&touchX, &touchY, 600);

  if (!touched) {
    data->state = LV_INDEV_STATE_REL;
  } else {
    data->state = LV_INDEV_STATE_PR;

    /* Set the coordinates */
    data->point.x = touchX;
    data->point.y = touchY;

    Serial.print("Data x ");
    Serial.println(touchX);
    Serial.print("Data y ");
    Serial.println(touchY);
  }
}

void setup() {
  Serial.begin(115200); /* Prepare for possible serial debug */

  String LVGL_Arduino = "Hello Arduino! ";
  LVGL_Arduino += String('V') + lv_version_major() + "." + lv_version_minor() + "." + lv_version_patch();

  Serial.println(LVGL_Arduino);
  Serial.println("I am LVGL_Arduino");

  lv_init();

#if LV_USE_LOG != 0
  lv_log_register_print_cb(my_print); /* Register print function for debugging */
#endif

  tft.begin(); /* TFT init */
  tft.setRotation(0); /* Landscape orientation, flipped */

  /* TFT Touch Calibration Values */
  uint16_t calData[5] = {363, 3382, 297, 3319, 2};
  /* Calibrating TFT Touch */
  tft.setTouch(calData);

  lv_disp_draw_buf_init(&draw_buf, buf, NULL, screenWidth * screenHeight / 10);

  /* Initialize the display */
  static lv_disp_drv_t disp_drv;
  lv_disp_drv_init(&disp_drv);
  /* Change the following line to your display resolution */
  disp_drv.hor_res = screenWidth;
  disp_drv.ver_res = screenHeight;
  disp_drv.flush_cb = my_disp_flush;
  disp_drv.draw_buf = &draw_buf;
  lv_disp_drv_register(&disp_drv);

  /* Initialize the (dummy) input device driver */
  static lv_indev_drv_t indev_drv;
  lv_indev_drv_init(&indev_drv);
  indev_drv.type = LV_INDEV_TYPE_POINTER;
  indev_drv.read_cb = my_touchpad_read;
  lv_indev_drv_register(&indev_drv);

  ui_init();
  Serial.println("Setup done");
}

void loop() {
  lv_timer_handler(); /* Let the GUI do its work */
  delay(5);
}

void ui_init() {
  lv_disp_t *dispp = lv_disp_get_default();
  lv_theme_t *theme = lv_theme_default_init(dispp, lv_palette_main(LV_PALETTE_BLUE), lv_palette_main(LV_PALETTE_RED), true, LV_FONT_DEFAULT);
  lv_disp_set_theme(dispp, theme);

  ui_Inicio = lv_obj_create(NULL);
  lv_obj_clear_flag(ui_Inicio, LV_OBJ_FLAG_SCROLLABLE); // Flags

  ui_Label2 = lv_label_create(ui_Inicio);
  lv_obj_set_width(ui_Label2, LV_SIZE_CONTENT);
  lv_obj_set_height(ui_Label2, LV_SIZE_CONTENT);
  lv_obj_set_x(ui_Label2, 0);
  lv_obj_set_y(ui_Label2, 0);
  lv_obj_set_align(ui_Label2, LV_ALIGN_CENTER);
  lv_label_set_text(ui_Label2, "Hello :D");
  lv_obj_set_style_text_font(ui_Label2, &lv_font_montserrat_36, LV_PART_MAIN | LV_STATE_DEFAULT);

  lv_disp_load_scr(ui_Inicio);
}
Conclusion
In this post, we explored the architecture of LVGL, illustrating how it separates UI code from hardware implementations through the use of drivers and buffers. We also walked through a straightforward "Hello World" code example, demonstrating how to display a simple label on an ESP32 using LVGL.
With this foundation, you can expand your projects by adding more complex UI elements and functionalities. LVGL opens the door to creating beautiful and responsive GUIs for embedded applications, and the ESP32 is a powerful platform for such projects.
Happy coding! If you have any questions or need further assistance, feel free to reach out in the comments.


